

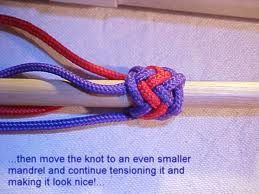
TYPE 1 - 2 PASS PINEAPPLE KNOT (from a 5x4 turk's head knot)
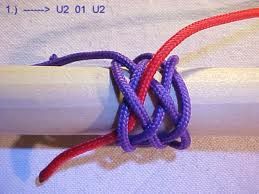
1. -----> U2 O1 U2
2. <----- O1 U2
3. -----> O1 U3 (splitting the pair)
4. <----- O1 U3 (splitting the pair)
5. -----> O1 U3 (splitting the pair)
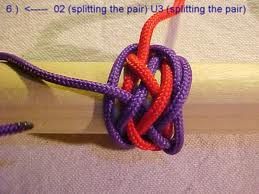
6. <----- O2 (splitting the pair) U3 (splitting the pair)
7. -----> O2 (splitting the pair) U3 (splitting the pair)
8. <----- O2 (& out)
(...you will be using these "O-U" instructions as well as some standard "rules" of making the type 1 pineapple knot!)
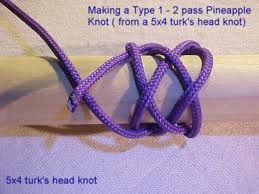
...starting out with a 5part/4bight turk's head knot (the short (top) end is the "standing end")...the long (bottom) cord is the "working end")
...the 5x4 is one knot worth memorizing! ...you will be using this knot a lot as you make the 7x6 and 9x8 by expanding the 5x4...this knot is in many books and you can also try here for information:
5x4 http://books.google.com/books?q=5+x+4+turk%27s+head
...the "type 1 - 2 pass" pineapple knot means that there will be a smaller turk's head braided inside a larger turk's head knot....in this case the large turk's head is a 5x4
and the smaller turk's head inside will be a 3x4....
...the weave starts out "U2" and you generally start the it one "south" of the working end of the 5x4 (actually you can start it anywhere but it might be best to keep things in
order?!...when making larger pineapple knots with 3 and 4 interwoven knots keeping things in order helps!)
...here the weave starts out "U2" and the "rule" is that the cord will "railroad tracks" or "parallel" the cord that it is under "until something happens"!...
...this photo shows how the weave to make the inside turk's head starts out!....
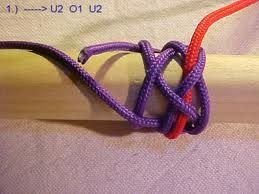
...here the first left to right (1. ----> U2 O1 U2) is made....by the "rules" what happened was the cord paralleled the cord it was under "until something happened"....what happened was that since the smaller turk's head will be inside the larger turk's head it had to keep inside the larger turk's head....so at the edge it had to go "U2"....
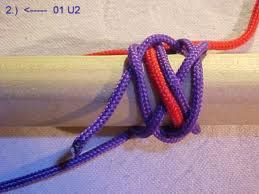
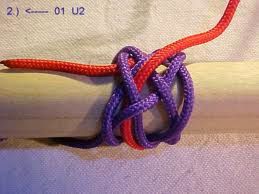
...these 2 photos show 2. <----- O1 U2 ...but if you notice the cord parallels the cord it is under!!... when it comes the the left edge ("something happens") it goes "U2"
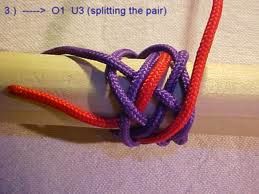

...here we come to the first "splitting the pair" ((one "splitting the pair" will be on the edge of the knot and the other will be on the inside of the knot!!!))....
3. -----> O1 U3 (splitting the pair) ...the cord goes "O1" and then it will go "U3" but it will also "split the pair"...
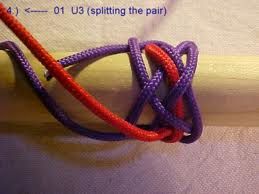
...back to paralleling the upper cord...it is:
4. <----- O1 U3 (splitting the pair)

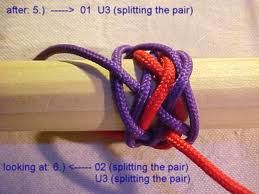
here is the first "splitting the pair" that is in the middle of the knot, so:
6. <----- O2 (splitting the pair) U3 (splitting the pair)
this is how it will look after:
6. <----- O2 (splitting the pair) U3 (splitting the pair)
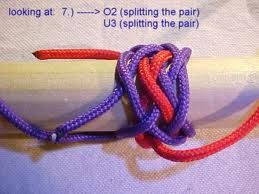


...these 3 photos show:
(again splitting an inside pair)....
7. -----> O2 (splitting the pair) U3 (splitting the pair)
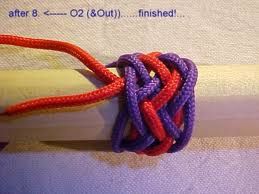
...then it is: 8. <----- O2 & Out ....finished

...the main point in showing how to make the type 1 - 2 pass pineapple knot with these instructions is to give an idea of how these knots work...if you can make a type 1 - 2 pass pineapple knot from a 5x4 turk's head the rules are the same for making one from a 7x6 or 9x8, etc....
...there is one thing to keep in mind though when making these type 1 pineapple knots!!...some "inside" turk's heads cannot be tyed!...for example: if the outside turk's head knot is an 11x6 turk's head the inside turk's head will be a 9x6 turk's head....which can't be tyed!....this is speaking from experience!!...and it only took me an hour to figure it out!....so do the math!...
...Dan Alaska