

STAR KNOTS
The first knot book I bought over 25 years ago was The Marlinspike Sailor by Hervey Garrett Smith. It had the directions for the Star Knot. I tried to tye it and after about a year I finally gave up. After another year I finally tyed my first Star Knot with the help of another knot tyer. It was not tyed the same way as these directions, as I didn't even have a needle! There are quite a few books with the directions for making Star Knots:
The Ashley Book of Knots by Clifford W. Ashley
The Marlinspike Sailor by Hervey Garrett Smith
The Complete Book of Decorative Knots by Geoffrey Budworth
Knots, Splices and Fancy Work by Chas.L. Spencer
Creative Ropecraft by Stuart E. Grainger
The Harrison Book of Knots by P. P. O. Harrison
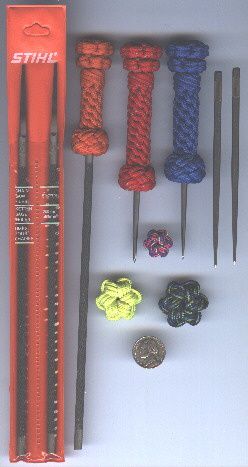
...these are all excellent knot books and as all Star Knots are made the same way, any of these books should be used as a reference while making Star Knots from the directions on these pages. To start out, a couple of simple projects is to make a handle for a chain saw file and a handle for an ice pick.
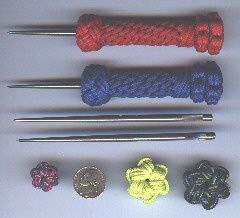
Diagram 2
Ice picks have many uses. I make these for fly fishermen who use them in their fly tying. There are many Star Knot projects to make and making an ice pick handle is an easy project to start out with in learning how to make Star Knots.
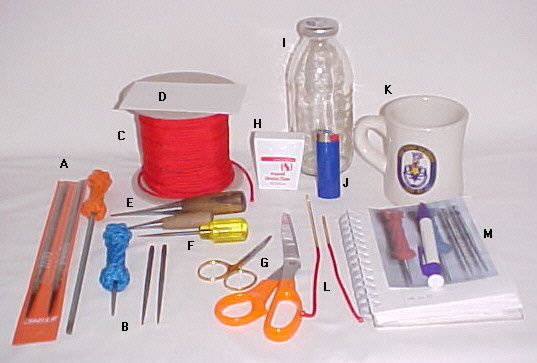
Diagram 3
Tools
Here are the tools needed to make the chainsaw file handle and the ice pick handle:
A. chainsaw files
B. ice picks
C. cord (3mm paracord)
D. white index cards
E. Japanese Marlinespikes
F. ice pick awl
G. scissors (small & large)
H. dental floss (waxed)
I. bottle
J. BIC lighter
K. (bos'n mug)
L. "self-threading" needles
M. notebook
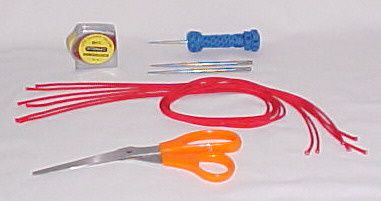
Diagram 4
For these two projects cut 6 strands of 3mm paracord 28".
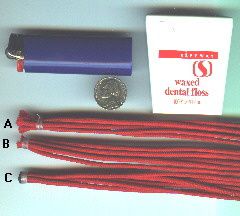
Diagram 5
Using dental floss, use half hitches to bind the ends of the six cords securely.
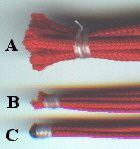
Diagram 6
A better view of the ends:
A. tye the end securely with dental floss
B. cut flush close to the dental floss
C. melt the ends together with a BIC lighter.
Make sure these ends are secure!

Diagram 7
Melt tapers on the other ends for the "self-threading" needle using a BIC lighter.
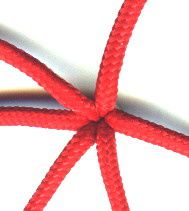
Diagram 8
In tying the six cords together, make sure that the 6 cords are symmetrical!
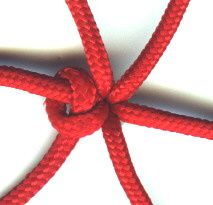
Diagram 9
Begin making the Star Knot with a "Single Hitch".

Diagram 10
Continue making the single hitches on all 6 cords. There are a couple of ways of making these hitches, but I will leave it up to you how you make them. These photos should be as explanatory as you will need in making the first step in making a Star Knot. In making Star Knots the first steps are as important as the last steps and these hitches should be as symmetrical as you can make them. They should be fairly tight, but you will be passing the needle through the knot twice more in making the Star Knot. At this point symmetry is more important than the tightness of the hitches. The best teacher is experience and the best way to learn how tight to make these hitches is to make a lot of Star Knots!
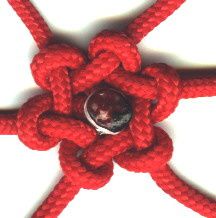
Diagram 11
This a view of the back of the knot after you have made the hitches.

Diagram 12
Now make a "Crown Knot".

Diagram 13
Now using the "self-threading" needle, each cord will go as shown in the photo. If it helps, use the books on Star Knots as a reference.
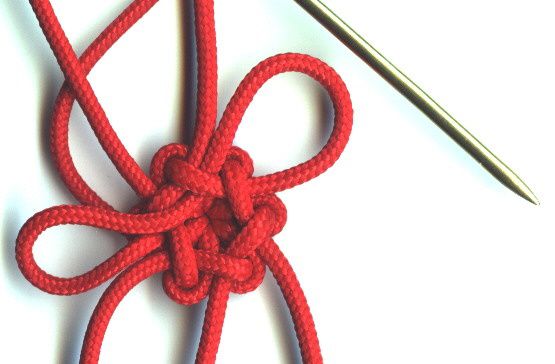
Diagram 14
At this point you should leave "thumb-sized" loops before you tighten up. In making Star Knots, I am constantly tightening/pulling/tugging, etc. the knot to keep it's shape and these little "thumb-sized" loops make it easier to do. Using the loops, finish off this part of the knot as symmetrical as possible.

Diagram 15
Tighten the loop making sure to retain the tension/symmetry.
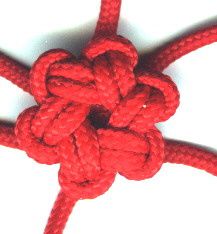
Diagram 16
This is how the Star Knot will look after the top cords are doubled. How the knot looks at this point will determine how the knot will look at the finish! I use the small "Japanese Marlinespike" and the ice pick awl to work the knot at this point to make it look as symmetrical as possible.

Diagram 17
The next step will be from the back of the knot.
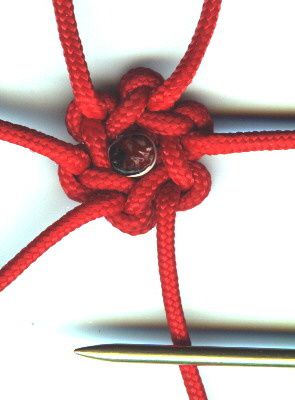
Diagram 18
Using the "self-threading" needle...

Diagram 19
...each cord will go through the knot from back to front.

Diagram 20
Each cord will go through the knot from back to front. You will find that this step is not hard to do at all once you find where the needle goes. There is nothing in the way of the needle and it will go through the knot easily. At this point I make the Star Knot a little different than in every knot book I've seen. I leave a "thumb-sized" loop. There are two reasons to leave the loop:
A. You will use this loop for leverage to tighten the knot later.
B. In every knot book I've seen this loop is shown as being tightened. Actually, when it is tightened at this point it will be in the way of the cord going through the knot during the next step! By leaving the loop, the next step will be much easier.
This photo should be as explanatory as needed to show where each cord will go through the knot. If it helps, you can use one of the books on Star Knots as a reference.
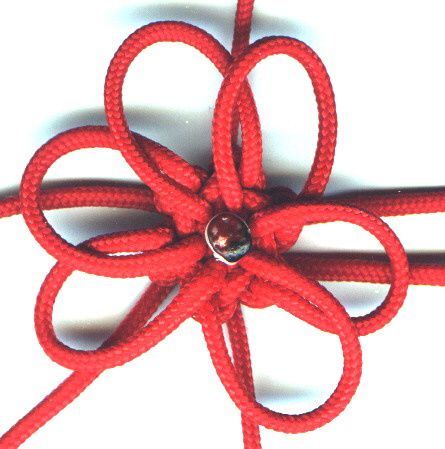
Diagram 21
Each cord will be left as a "thumb-sized" loop.

Diagram 22
This next step can be a bit confusing at first. Each cord has to go through the knot once again to finish it off. It may look like the cord "B" (the other end of cord "A") naturally falls into place at "X"...but it doesn't!...it goes one place counter-clockwise (at "C"). This step is not explained in most books, and it is very important.
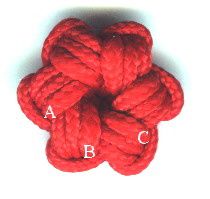
Diagram 23
Here is what happens when each cord is placed where it looks like it should naturally fall. This Star Knot was made to show what happens. This is not the way a Star Knot should look! "A" should be where "B" is. "B" should be where "C" is, etc.
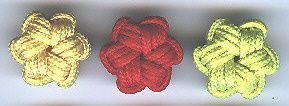
Diagram 24
This photo shows properly made Star Knots.
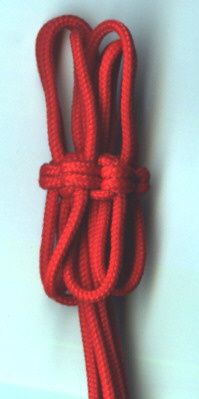
Diagram 25
Each cord will now go from front to back. As shown in the books on Star Knots, each cord goes under 4 cords. In the books, the 4th cord is shown as being tight at this point (and in the way of the needle!). Because this 4th cord is shown as a "thumb-sized" loop, it will not be in the way of the needle. This step is not hard at all if your needle has a proper "Star Knot" tip! One trick you may find helpful is to use the large "Japanese Marlinespike" to find the "path" of the needle and you will find that immediately upon removing the "Japanese Marlinespike", the needle will easily find the way. There may be quite a bit of pressure on the brass needle. By using the "Japanese Marlinespike" a lot of the tension will be removed. With "thumb-sized" loops on both sides of the knot, it may look like you have a real mess!!...but all that's left now is to tighten the knot up, and by using the loops for leverage, you will find that tightening up the knot is not hard at all.
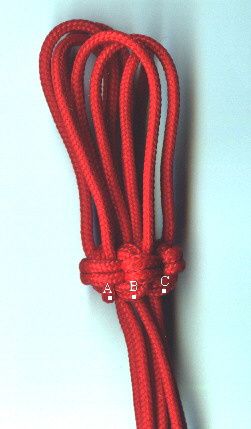
Diagram 26
Pull the bottom loops fairly tight by pulling from the top. At this point the important thing to remember is that the "back cords" on the bottom (A,B,C,etc) have to be as tight (or even just a little tighter) than the outside cords. This is done while tightening the top cords. Actually you will be tightening both sides of the knot during the final step of tightening the top cords.

Diagram 27
As shown, this is how the bottom cords should look. The inside cord should be as tight as the outside cord.

Diagram 28
The next step is to make the knot look nice. I use the small "Japanese Marlinespike" (or/and the ice pick awl). You can dig the awl into the knot from the side and pry up any of the 3 cords to make them look symmetrical. The awl goes into the knot where no mark/distortion will be left. You will find that it is easy to make the Star Knot look nice by using the awl.
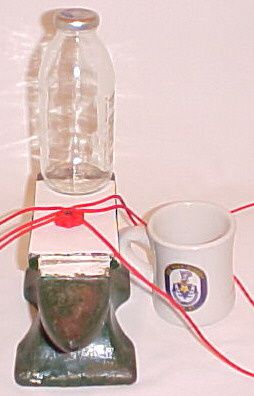
Diagram 29
At this point, there is a trick that is not mentioned in any of the books. You will flatten the Star Knot by putting the knot on a white piece of paper (a white index card works best)...the white card is used so that no dirt will be picked up. *(you don't need an anvil!!...just a solid surface/table) You will flatten (NOT crush) the Star Knot. Use the bottle (actually a bos'n mug works great!) and gently hit the Star Knot....this will flatten it out a bit. When you have done this, you may need to use the awl again and do a bit of final touch-up.
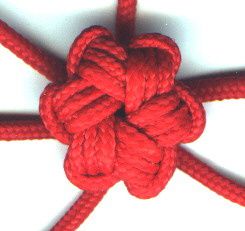
Diagram 30
This is how the Star Knot should now look!
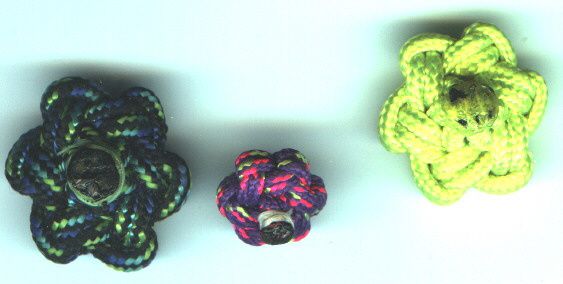
Diagram 31
At this point, one little project to make is the "refrigerator/"in-out" board magnets"...I tye the bottom cords off and melt the ends and then they are glued into the wooden plug for the magnets.

Diagram 32
These magnets were handmade/carved using cottonwood bark. I used a little compass to make the circles and i used a Stanley wood shaper/sandpaper/whittling knife/varnish to make them. The magnets go in the back and the knots go in front. There are probably dozens of knots using almost any type of cord to make these magnets!

Diagram 33
Anyway, back to making the handles!...after you have made the Star Knot, you will add the bottom half of the knot. The steps are the same as making the Star Knot (with a few steps left out!)....start by making the "Single Hitches" as shown. One important thing to remember while making the bottom half of this knot is that it has to be smaller than the top part! You will have to make the bottom half as tight as possible from the start to do this. If the bottom half is as large or larger than the top half, the knot does not look good at all! So keep in mind that the bottom half has to be made as tight as possible from the beginning!

Diagram 34
Now make the "Crown Knot" and follow through. This photo should be self-explanatory!

Diagram 35
This is how the bottom of the knot should now look.
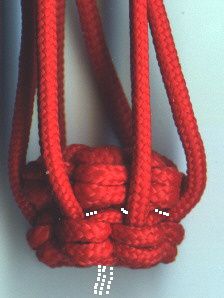
Diagram 36
The next step is to put each cord through the knot one final time. Actually, this step is a lot easier than it looks! Each cord goes directly into the center of the knot and then down through the bottom. You will find that there is nothing in the way of the needle. Now tighten up the bottom half of the knot using the cords as leverage.

Diagram 37
Now you can again flatten the knot using the bottle...this is how the knot should now look!
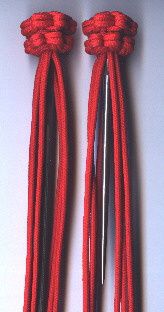
Diagram 38
Now insert the chainsaw file/ice pick inside the center of the knot. I suggest you put a little wooden/plastic bead over the end of the ice pick to prevent yourself from getting stabbed!

Diagram 39
Now add Matthew Walker Knots.

Diagram 40
Now add the Crown Hitching. Note that the first crown after the Matthew Walker Knot is a "Single Crown". After that the rest is "Double Crown" (or "Complex Crown") hitching. Use your best judgement to take the hitching up to the point where you feel the finished knot will look best.

Diagram 41
Finish off the knots with "Footrope Knots" (in this case, 5-lead Footrope Knots are used).