

NANTUCKET SAILOR'S BRACELETS...Lesson 1
Lesson 1 - "odd" lead turk's head knots


~ Nantucket Sailor's Bracelets ~
For years folks have been asking how I make the "Nantucket Sailor's Bracelets". These bracelets are simple "narrow" turk's head knots. *(mostly 4x11, 5x14, 6x17, 6x23), but there are many other basic "narrow" turk's head knots that will work to make a nice "Nantucket Sailor's Bracelet"! These very popular classic bracelets are made by the process of "expanding" smaller turk's head knots into larger turk's head knots using a "mule"! A "mule" is simply a short piece of cord (attached to a "needle") that is used to keep your place for one revolution of the turk's head knot. At the IGKT-PAB meeting in Los Angeles in 2000, several folks asked me to show them how I made these bracelets. I began showing them and they all walked away laughing before my "lesson" was over! They were laughing because they could not believe how easy these bracelets were to make!......

....to begin with, we will start by learning the 5x14 turk's head knot.

Materials & Mandrels
These bracelets can be made out of many types of cord. Shown here are hemp, "hard-laid" cotton and tarred seine line. The mandrels shown here are mostly PVC/ABS plastic pipe couplings. They can be found in hardware stores in both the plumbing and electrical sections. My collection of sizes range from 2 3/4" to 4". It is a good idea to have a nice selection of sizes of mandrels to make these bracelets. People's wrists vary in sizes and range from x-small to xxx-large!!!.....

Materials
Many types of materials can be used to make these bracelets. Shown here is "hard-laid" cotton and here is the "mule" - a short (18") piece of cord and the main cord used to make the 5x14 bracelet. It is best to keep a notebook and record the exact lengths you use to make these bracelets. This cord is #72 "hard-laid" cotton and is cut at 17'. It is best to cut your first bracelet cord a few feet longer and keep a good record of how much cord is used depending on the sizes of your mandrels!....
Tools
Not many tools are needed to make these bracelets. Shown here are the "needles" and "Japanese Marlinspike". Forceps can be used with some cords. "Band-Aid" tape is used for some cords such as this "hard-laid" cotton. Scissors.
To start with, an excellent book to use as a reference for making these knots is:
The Marlinspike Sailor by Hervey Garrett Smith
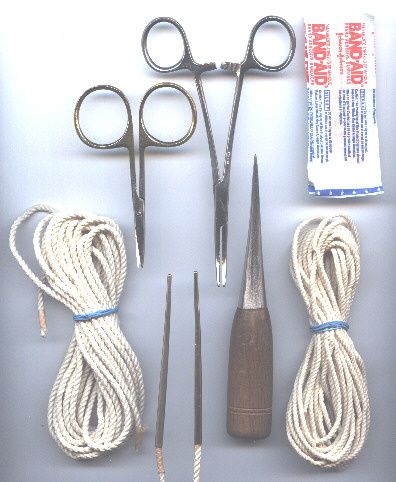
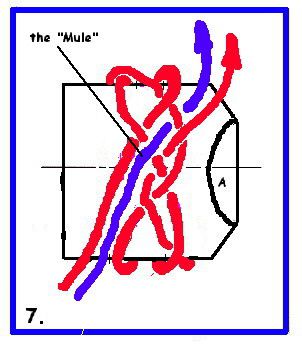
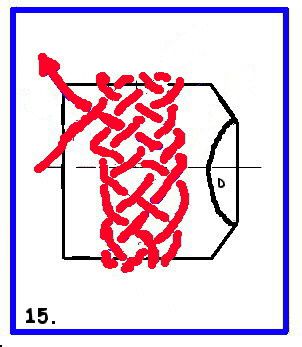
These bracelets are made by "expanding" smaller turk's head knots. To start, this diagram shows how some "odd number-lead" turks heads begin.
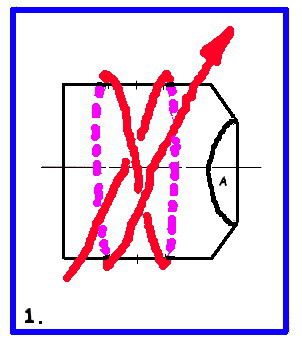
To "expand" the "bights", you do the "A-B Crossover"...

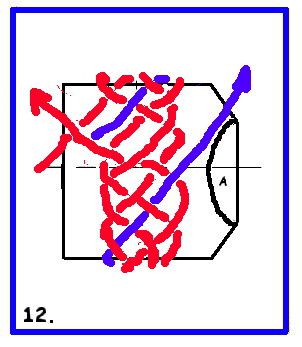
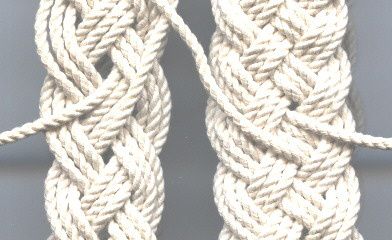
On these bracelets, the pattern is "casa" and this is a simple "over-one, under-one" pattern throughout the bracelet from beginning to end. "A" goes over "B", and the working end simply goes "over-one, under-one".

This is the "A-B Crossover", and this is how the bights on these turk's head knots are "expanded". You can continue to do the "A-B Crossover" for as many times as required for the turk's head knot you are making! For the 5x14 Nantucket Sailor's Bracelet, you will do the "A-B Crossover" TWICE only!

Continue on after making the "A-B Crossover" TWICE!....
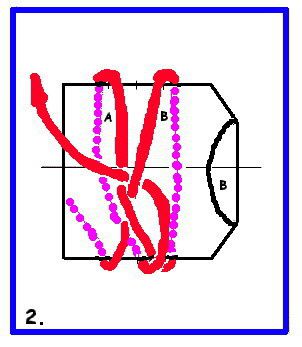
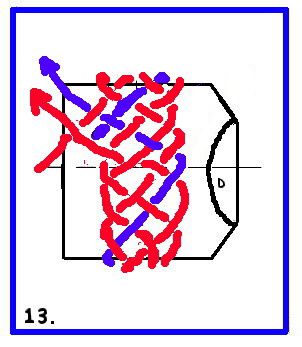
Now you will come to the beginning (standing end) of your knot and you will now make a "pair". (Notice that if you continue to double/triple the leads(parts) you will simply be making a 3-lead(part) bracelet!). The "pair" (sometimes called "laying tracks" (as in railroad tracks) will now be "split" by using the "mule".
Using the "mule" begin "splitting the pair" by simply using the "mule" to go between the two pairs. When the "pair" goes "under", the "mule" goes "over", etc...

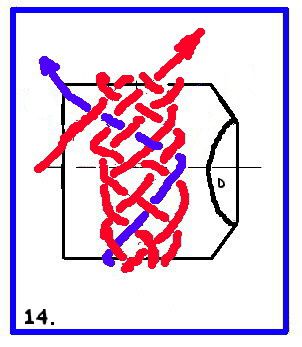
Then the "working end" goes "under-one, over-one" in the "casa" pattern. An important note here is to remember that the "mule" makes it's pass...then the working end makes it's pass...then the "mule" takes it's turn, etc...etc...each takes it's turn and one does not get ahead of itself, etc.!!!....

...after the working end has made it's pass, the "mule" makes it's pass, "over-one, under-one", etc...

...now the working end makes it's pass, "over-one, under-one", etc...

...now the "mule"...
...now the working end...
...now the "mule" makes it's final pass...
...now the working end simply replaces the "mule". Remove the "mule" as it is replaced by the working end. *(Don't get ahead of yourself here! Remove the "mule" as it is replaced!)
The "mule" is completely replaced by the working end.

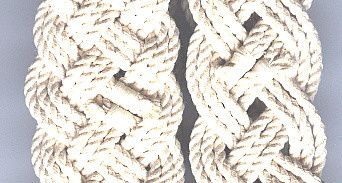
As the working end meets up with the standing end, another "pair" is made! (NOTICE that you can again "split" the "pair" with the mule, and this will expand the 5 lead(part) turk's head knot to a 7 lead(part) turk's head knot!) Simply triple the leads and you are almost done with the bracelet!
All that is left is to seize the ends together. Turn the bracelet "inside-out".
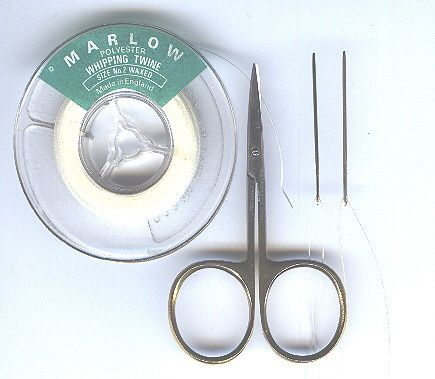
I use Marlow Whipping Twine to seize the ends.
Also "tapestry" needles (dull ends, large eyes).
!*(whipping=1 end....seizing=2 cords together, (same knot!!))

I use a "common seizing". This seizing is in most knot books and a very nice diagram is in:
The Marlinspike Sailor by Hervey Garrett Smith
Make this seizing as nice as possible!
Snip the ends.

Turn the bracelets "inside-out" again.
Finished!!
Tips!
1. Make the "diamonds" as even as possible from the very beginning! Use the "Japanese Marlinspike" to tension the bracelet. Start with a larger mandrel and move it to a smaller mandrel as it gets tighter!
2. If you find that the working end doesn't match up at the end, go back over your knot and find your mistake! It will be there!
3. A nice set of mandrels help to make nice bracelets. It is a real scavenger hunt to find a nice set! The plumbing and electrical sections of hardware stores are a good start! You will be amazed at the difference in sizes of people's wrists! from xxx-small to xxx-large!!
4. Notice that these are "odd-lead" bracelets (5 lead(part))...the "odd-lead" turk's heads are made by "expanding" the 3 lead(part) turk's head knot. You "expand" the "bights" by doing the "A-B Crossover". You expand the "leads" by using the "mule" to "split the pairs". You can come up with many variations of these turk's head knots by using these two simple tricks! (No wonder folks walked away laughing in Los Angeles before I had finished my lessons!!!)